# Creating Unit Transfers
## Overview
A *unit transfer* adjusts loyalty units in a member’s wallet. Use it when units don’t come from a purchase or campaign. This is useful for corrections, bonuses, and manual deductions.
Unit transfers appear in the **Unit Transfers List** and become part of the member’s unit history.
### When to use unit transfers
You might create a unit transfer to:
* Give bonus units to a member
* Correct balances after a data or integration issue
* Deduct units for policy compliance
* Apply rewards or penalties manually
### Transfer types
You can choose between:
* **Add units** — Increases a member’s balance
* **Deduct units** — Decreases a member’s balance
{% hint style="info" %}
Unit values support fractional amounts up to six decimal places.
{% endhint %}
### Step-by-step instructions
Follow these steps to create a unit transfer in the Admin Panel:
{% stepper %}
{% step %}
**Open Unit transfers**
Go to **Wallets → Unit transfers**.
{% endstep %}
{% step %}
**Start a new transfer**
Click **Add units**. (alternatively, click **Deduct units**)
{% endstep %}
{% step %}
**Fill in transfer details**
Required fields:
* **Wallet type** — Select the wallet to apply units to
* **Member** — Find the member by email, phone, or loyalty card
* **Transfer type** — Choose **Add units** or **Deduct units**
* **Value** — Enter the unit amount
Optional fields:
* **Comment** — Add context for audits and support
* **External transfer ID** — Add a unique reference for sync and deduplication
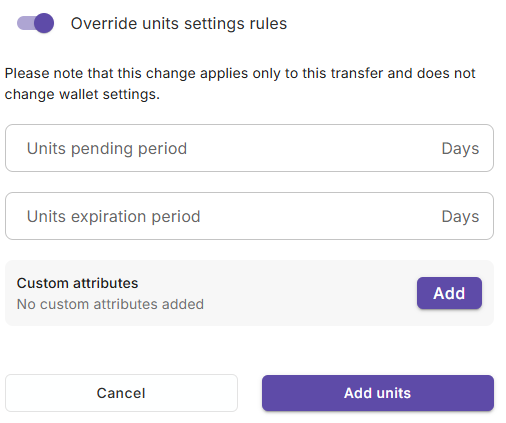
* **Override unit settings rules** — Bypass expiry or locking for this transfer only. This does not change global wallet configuration.
* **Custom attributes** — Add key-value metadata, like `reason` or `orderId`
{% endstep %}
{% step %}
**Confirm the transfer**
Click **Add units** (or the equivalent button for deduction). You’ll see the transfer in the **Unit Transfers List**.
{% endstep %}
{% endstepper %}
### Tips
* Use **comments** to make transfers easy to understand for other admins.
* Set a unique **External transfer ID** if syncing with external systems to prevent duplicate imports.
* **Custom attributes** are great for tagging transfers with extra context (e.g., promotional campaigns or internal references).